Guest posting is hands down one of the best marketing methods you can use to grow your blog (if not the best). That’s a fact!
Whether you’re into acquiring more clients, building relationships with other webmasters, improving your site’s SEO, or growing your traffic (among many others), chances are good that you’ll get good results if you’ll use guest posting as your main marketing method.
So how exactly do you guest post? And by ‘how’ I meant the nitty gritty of the process. While contacting a website and asking them if you can write for them seems a pretty straightforward thing to do, there is more to guest posting that meets the eye.
This is especially true if you’re trying to scale the process. Of course, if you want to see results, guest posting on one site alone won’t cut it. You have to connect with a couple more niche related and authority sites to TRULY reap the benefits of guest posting.
If you’re looking to do just that, then this definitive guide is definitely what you need.
To give you a bird’s eye view of the entire guide, allow me to share with you the steps that we’ll be talking about.
1.) The free tools that we’ll use for the entire guest posting process
2.) Data mining
a.) Spreadsheet/template for data mining and outreach work
b.) Setting your search results to 100
c.) Using Google’s advanced search queries to get target results
d.) Scraping the data
e.) Obtaining the site’s statistics (PR, PA, DA and monthly traffic)
3.) Crafting your outreach letter
4.) Writing the article
a.) How to write an award winning article that the webmasters will approve.
5.) General tips
a.) Establish your link building assets.
b.) Giving each site a closer look. Making sure that the site is definitely worth linking.
Alright. Now that we got that squared away, let’s hop right into the details of the process.
1.) The free tools that we’ll use for the entire guest posting process.
You read it right. I wrote ‘free tools’.
With the process that I’ll teach you, you won’t have to spend hundreds of dollars worth of membership fees. Everything is free, except maybe the time you’ll spend to actually do the work. After all, time is gold.
Here are the tools that you’ll need.
You’ll need the SEOQuake plugin to scrape the data from Google.
This is where I usually sort the data that I’ve scraped from Google.
I use this tool to obtain – in bulk – the Page Rank of the site’s that I’ve mined.
This is the tool that I use to determine the site’s PA (Page Authority) and DA (Domain Authority).
I use similarweb.com to determine the site’s estimated monthly traffic and its overall quality.
These are the only tools that we’ll use from start to finish. Once you’ve prepared all of these, we should be able to proceed to the next step.
2.) Data mining
Data mining is basically the part of the process where you’ll obtain the list of sites that you’ll guest post on.
To make sure that everything is organized, we need to have a spreadsheet/template.
a.) Spreadsheet/template for data mining and outreach work
I won’t delve into the details of the template since it will be explained as you progress on this guide. However, allow me to tell you that I use Gdocs spreadsheet and I usually start with 6 columns on my template (Domain, PR, PA, DA, Monthly Traffic and Status).
Here’s how it looks like → http://tinyurl.com/lw787uh
The 6 columns I added is the bare minimum of what I use when guest posting. I usually end-up adding other columns like contact person, email, fees, paypal account, etc. But let’s go with these 6 for now.
b.) Setting your search results to 100.
Before you start using Google’s search box, you need to set your search results to show 100 results per search first. Google’s default is to show only 10.
We need to do this to save time and maximize our efforts. That way, when we start scraping the data, we’ll end-up a lot faster than we would if Google is only set to show 10 results (more on this later).
Here’s how you do this.
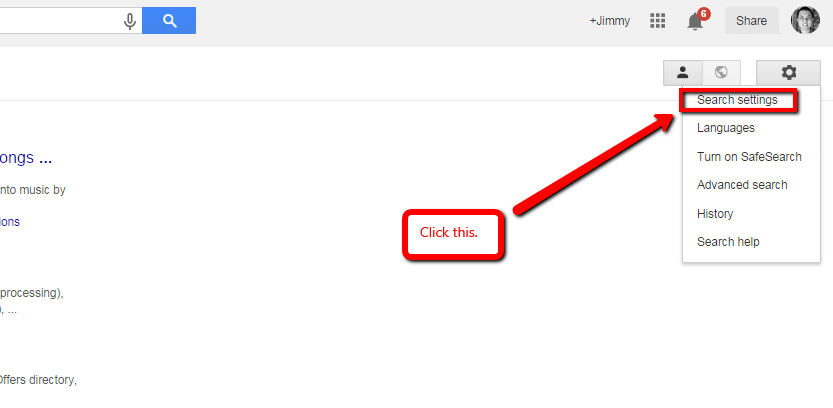
1.) Click the gear looking icon on the upper right side of Google.com and click ‘search settings’.
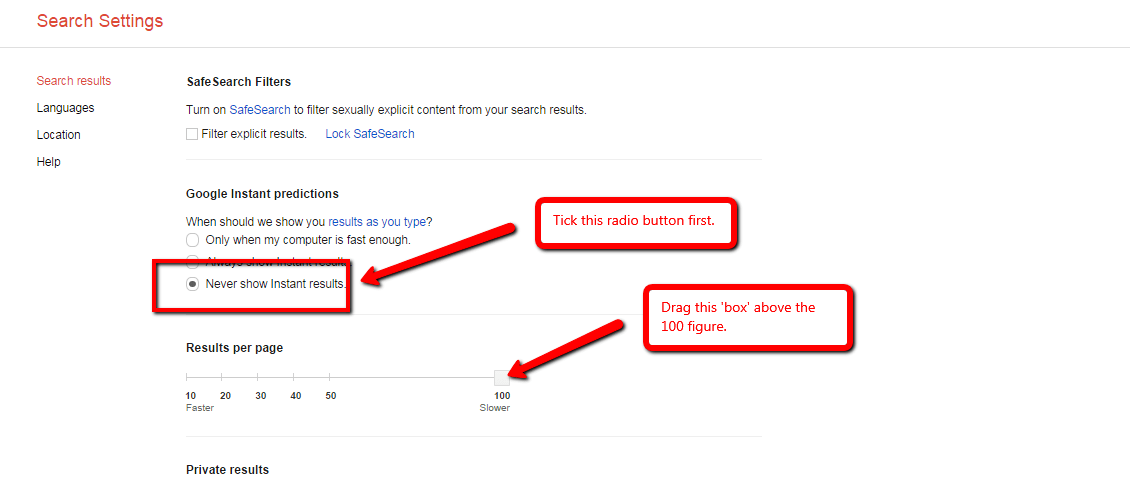
2.) Tick the ‘never show instant results’ radio button then drag the ‘results per page’ to 100.
3.) Scroll to the bottom part of the page then click ‘save’.
Once you’ve done this. Everytime you type in a keyword in Google’s search box, it should give you 100 results instead of the default that’s only 10.
c.) Using Google’s advanced search queries to get target results
There is more to using Google’s search box than just typing in keywords. If you want to get better search results from Google, then you can use Google’s advanced search queries.
If it’s the first time you’ve heard of it, then I’ll just share a couple of search queries with you that will get you websites that allows guest posts.
* Note – Not all of these websites will allow guest posts. However, most of these will.
“Keyword phrase” + “Guest Post”
“Keyword phrase” + “Write for us”
“Keyword phrase” + Become a contributor
“Keyword phrase” + Become an author
Here’s another resource that you can look at to learn more about Google’s advanced search queries. Click here.
Here’s a search query generator that you can use if you’ll ever need it. Click here.
d.) Scraping data
Now that Google’s search results has bought you sites related to your niche that allows guest posts, what do you do next? Do you manually open each result and list down the domain until you’ve listed everything down?
Of course not! It’ll take you years to do that.
This is where you’ll use SEOQuake.com to scrape the data.
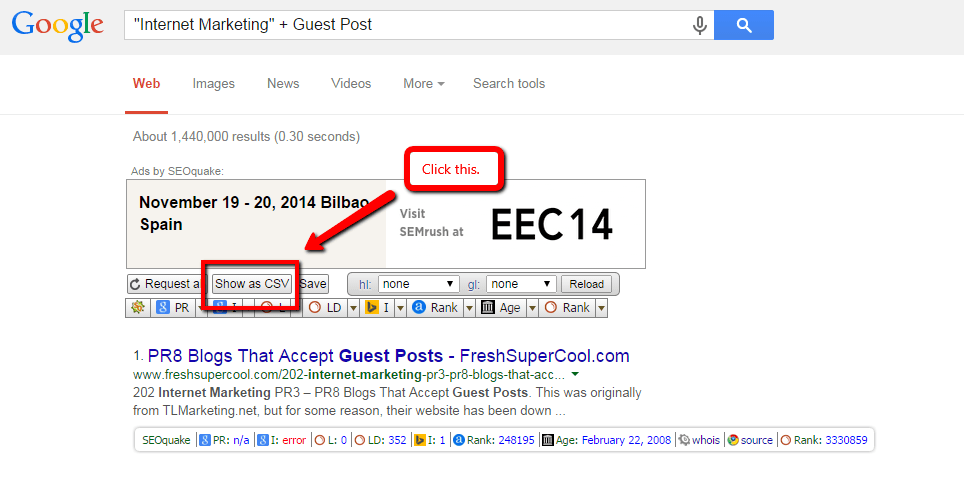
You just have to install the plugin on your browser and enable it. Once you’ve done that, you just have to type in your search query on Google’s search box, hit “search”, then click the “Show as CSV” button.
Let’s use this search query as an example – “Internet Marketing” + Guest Post
After you click the “Show as CSV” button, it will then show you all the scraped URLs. From there, you can copy and paste everything in you MS Excel spreadsheet.
* Note – The URL shown is ONLY for the search results on that page. That said, if you want to scrape the URLs on the succeeding pages, you have to click the other pages first.
I usually do 2 – 3 pages at a time, that way, I can balance everything out and still have time to send email outreach.
e.) Obtaining the site’s statistics (PR, PA, DA and monthly traffic)
Now that we’ve scraped the urls, we need to remove the extensions from these URLS so we can get the domain’s statistics.
Here’s how to do that.
By now you should have already copy and pasted the URLs on your MS Excel spreadsheet.
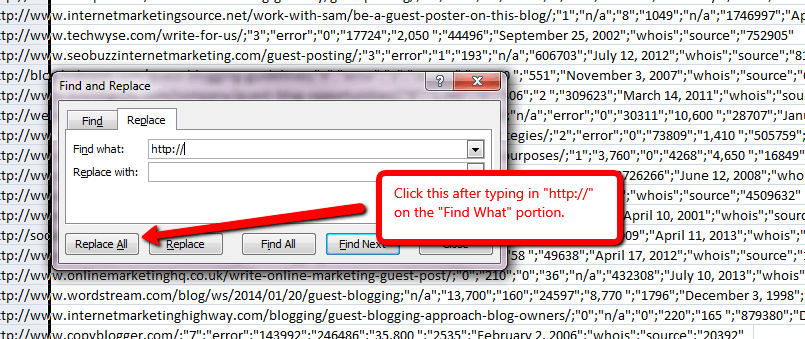
You have to highlight the entire column (column A), then click the “Find & Select” icon on the top right corner of the document.
Click “replace” then on the first box where it says “Find What:”, you have to type in “http://” then leave the “Replace with” box blank, then click the “Replace All” button on the left hand part of the pop-up.
You then to do the same thing 3 more times. But instead of typing in “http://” again, you need to type in “https://”, “www.” and “/*” respectively.
This will then remove the extensions of your URLs. That said, what you’ll be seeing on each row should just be the domainname.com.
Now that you’ve already removed the extensions, we’ll proceed with the next step which is obtaining the site’s PR, PA and DA.
As mentioned above, use Prchecker.pw to obtain the PR of the sites, and 99webtools.com for the PA and DA.
While there are a couple of site statistics that you can capture, I usually just go with the site’s PR, PA, DA and monthly traffic.
I usually only work with sites with PR 3+, DA 30+, PA 30+ only. Anything lower, I tend to neglect. I sort the results from the smallest to largest so I can remove the sites with lower numbers in bulk.
As for the monthly traffic, I usually work with 10K as my minimum. Obtaining the monthly traffic requires a bit of a manual work though. You have to check each of them via similarweb.com.
3.) Crafting your outreach letter
As you can probably imagine, there isn’t a template that you can use that can guarantee 100% success rate for your outreach. However, I’d like to share with you a couple of things that you need to consider when creating one. These tips will greatly increase the chances of them (the webmasters) from opening your email and actually responding to it.
Here are my tips:
Think of an overlap between your interest and theirs.
Let’s face it, when you ask the webmaster for a guest post, the first thing that will probably cross their mind is how they can benefit from it. You’ll probably feel the same way too if you were them. So why not cover that on your outreach email?
This is the part where you talk about your link building assets. And when I say link building assets, I’m talking about your huge social media following, your email list, perhaps your site’s traffic, or basically anything of value that you can share to the webmaster.
The idea is, you’ll tell the webmaster how you can mention them on your assets so they can have more viewers in their website. That is, if traffic is the webmaster’s main concern.
To know more about what the webmaster’s interests are, you can check out their site and find some clues about it.
Look for the webmaster’s name.
Addressing the webmasters by their names (use their first name ONLY) make your email look legit and personal.
Avoid using “Dear Mr. Last Name”, “Dear Mrs Last Name”
I know that you’re probably using it to sound professional, but the thing is, that’s just not how things work nowadays.
If you used this kind of greeting or salutation 20 to 30 years ago when sending letters to other people, then you’d have done an “OK” job. But now that spam emails/messages abounds, you’ll just be considered as such if you use that kind of heading.
Customize your outreach templates
You read it right, I said “templates”. Contrary to what others say, I’m actually a huge fan of using templates when doing outreach. Because if I don’t use any, then it’s going to take twice the time for me to craft the email messages.
While I’m an advocate of templates (and I suggest you become one as well), I want to emphasize how my templates are heavily customized even before I send them.
As you can probably imagine, you need to make your outreach emails sound personal. You can still achieve this by using a template for as long as you customize it.
Prepare a headline and outline of your guest post
Including your headline and outline for the article on your outreach gives the webmaster a good idea of whether or not your article is a perfect fit for them. This helps remove a lot of guess work on their end. At this point, they can accept or decline your proposed guest post. This is way better than them simply ignoring you because they’re uncertain whether or not to accept or decline your offer.
When they decline your guest post, you can easily ask them what needs to be changed or if there’s another topic that they want. Once you’ve determined this, you can then craft the article accordingly.
Add samples of your previous work. Share your urls and not attachments as much as possible.
I guess it’s obvious why it’s always a good idea to share your samples. It gives them a clear idea of your writing style and the quality they can expect from you.
Again, it removes a lot of guess work on their end. Which quite frankly, is something that they GREATLY appreciate.
Just like what I mentioned above, it’s always a great idea to share urls instead of attachments. The thing is, a lot of these webmasters are paranoid when it comes to downloading stuff. Also, downloading files might take time.
Now compare that to them simply clicking and seeing your sample articles in a snap, that’s quite a difference, right? PLUS! The fact that you’re sharing a link is an indication that you’re sharing a published content. That in itself, is a huge plus to them.
Keep it short and straight to the point.
A word of advice. These webmasters are usually swamped with guest post offers. How do I know? Simply because their site is of decent quality (proof of this is you wanting to guest post on their site).
If you write a 5 – 9 paragraph outreach email, chances are good that they’ll find it overwhelming and decline you on the spot. Instead of doing that, it’d be best if you write a 3 – 4 paragraph pitch with only 2 – 3 sentences max per paragraph.
4.) Writing the article
Depending on the order of things, you’ll either end-up writing the article first and offer your pre-written article to the webmaster, or, they’ll tell you what they’re looking first THEN you’ll write the article.
In the latter’s case, you need to craft the article based on the guidelines they share with you and include anything specific that they mentioned in their email. However, if you’re going to write a pre-written article or if the webmaster only gives you the theme of the article and leaves you with the rest of the details as far as the article length goes (among many others), then I urge you to follow the guidelines that I’ll share here as far as how you want the article written.
The article should be a minimum of 1200 words.
People who spam or do guest posting for the sake of building links won’t go as far as writing an article of this length. They usually go for the 400 – 500 words length since it’s considered as ‘just enough’.
Writing an article with my suggested length will give the webmaster an idea of how serious you are as far as writing a quality post.
Break your articles into bite-size pieces.
When I say bite-size, I’m talking about keeping each paragraph to 3 – 4 lines max. While you’ll probably end-up breaking this law, 98% of your paragraphs should be within this threshold.
Articles with really long paragraphs tend to be ignored simply because the article looks very overwhelming at first glance.
Of course, if the webmaster feels the same way (overwhelmed) when he/she sees your article, there’s no way he’ll accept it.
Link to other relevant sites (posts not the homepage of a site).
A newbie guest poster will usually think of adding only one link (their link) for fear of the webmaster thinking of them spamming links. Actually, that isn’t the case.
Webmasters appreciate articles with tons of links (quite possibly 3 – 4 if you’re writing a 1,200 word article) since links add value to the content. However, I’d like to emphasize how the operative word here is to ‘add value’. If you’re links aren’t helping the readers understand that point that you’re trying to emphasize on the article, then don’t even bother adding them.
Aside from making sure that the links are pointing to a post that’s greatly relevant to your write-up, take the time to check the quality of the website that you’re linking to. If it looks spammy, then look for something else.
The webmaster might decline your article because of you linking to these low quality sites.
Write in a conversational tone.
Articles written in a conversational tone has a big tendency of connecting with your readers. So, go for it.
A good technique when writing in this tone is to ask questions. Questions that would make the readers reflect about what you’re writing about and relate it to their current experience.
It’s when you’re able to build or establish that connection between what you’re writing and what they are going through that they tend to be emotional thus keeping them hooked with on your write-up.
Conversational writing is so powerful that sales pages are crafted this way. I’ve read hundreds of sales pages and I have yet to see one that isn’t written in a conversational manner. That’s because this method of writing works as far as keeping the readers hooked – let alone making them act on what they’ve read about.
Add images.
* Note – Be VERY CAREFUL with where you get your images. I hope you know that simply adding attribution on images that you’ve gotten somewhere in the web isn’t enough if you want to use images legally. Here’s a VERY GOOD write-up about using images and the penalties that goes along with it. Click here.
I urge you to add 3 – 5 images when writing about a content with a minimum length of 1,200 words.
Not only do these images help you with your article’s aesthetics, but it also helps you convey messages better.
A good example is this. What if you’re writing a guest post about how to do push-ups. Can you imagine how tedious or challenging it would be to give them instructions on how to do push-ups using text? How about you use images instead? I’m sure you’ll agree with me that using images is the best way to do this.
Write a compelling title.
The way you craft your title plays a huge bearing on whether or not the webmaster will take the time to review your guest post OR for site’s viewers to even click and read it.
Make a boring one, and you’ll get a big fat NOTHING for it. However, if you craft something that’s punchy, these site visitors will click the heck out of your title so they can read your content.
Now the question is, how do you create a compelling title/headline?
If I answer this question now, I’ll probably add another 3 – 5 thousand words on this guide. Instead of doing that, I’ll share with you 4 of my MOST FAVORITE write-up about it.
You’ll be mind-blown at the trove of ideas you’ll get from these posts.
The Art (and Science) Behind Neck-Snapping Headlines – Writetodone.com
Now you can write copy that converts even if you’re not a writer – Appsumo.com
10 of the Best Email Subject Lines You’ve Ever Read – Hubspot.com
557 Email Subject Line Hacks to Get You Noticed in the Inbox – Crazyegg.com
Misc (grammar check, spelling, typos, etc.)
I don’t feel like adding this since this should already be obvious. However, let me just add it anyway since I did say that this is a definitive guide to guest posting.
Make sure that you proofread your guest post a bajillion times to make sure it’s crisp, clean, free of grammar errors, typos, spelling mistakes and the ideas transition well.
4.) General Tips
Alright! At this point, you’d have been able to publish a guest post already. You were able to obtain a list of sites (high quality ones at that) that you can guest post on, you were able to craft a well written outreach email, and send an article that’s of impeccable quality. You should already be waiting for the webmaster to publish your pitched article – if the webmaster hasn’t published it yet.
But before I end this write-up, I’d like to share with you a couple more tips to help you with your
a.) Establish your link building assets.
On the part where I talked about crafting your outreach letter, I talked a bit about link building assets and how important it is.
Because of the critical role it plays in GREATLY increasing the chances of the webmasters accepting your guest post offer, you need to make sure that you have a link building asset (one way or the other).
While there are a couple of platforms that you can build-up develop to becoming your link building asset, I’ll share with you two method for now.
Growing your Linkedin followers
The first one is growing your Linkedin profile’s followers so it becomes enticing enough for the webmaster when you tell them you’ll share their website on your Linkedin profile.
How do you grow your Linkedin profile, you might ask? Here’s an article that I wrote about Linkedin marketing. “Warning: These Out-of-the-Box Linkedin Marketing Tips Are EXTREMELY Actionable and Effective”
Some of the tips I shared isn’t just for growing your number of Linkedin followers, but also to establish your relationships with existing ones. You can uncover a lot of guest posting opportunities by following the tips that I shared.
Growing your Twitter followers
I’ll share with you an almost passive way of growing your Twitter followers. Sounds too good to be true? Well, I can’t blame you, when I first discovered this tool, I also felt the same way too. But hey, it actually works!
For you to grow your Twitter followers, you need to sign-up for Twibble.io (don’t worry, it’s free).
Twibble is the one tool that will skyrocket your number of Twitter followers the legit way. You won’t be spamming them or anything, you’ll just be sharing TONS of quality content.
The best part is, since you can link your Twitter account to your other social media accounts like Linkedin and Facebook, you can be certain that you have a constant flow of highly targeted and high quality content on each of your social media sites.
The way Twibble works is that takes content (for the lack of a better word) from the sites of your choice and post the content directly to your Twitter account. But wait, there’s more!
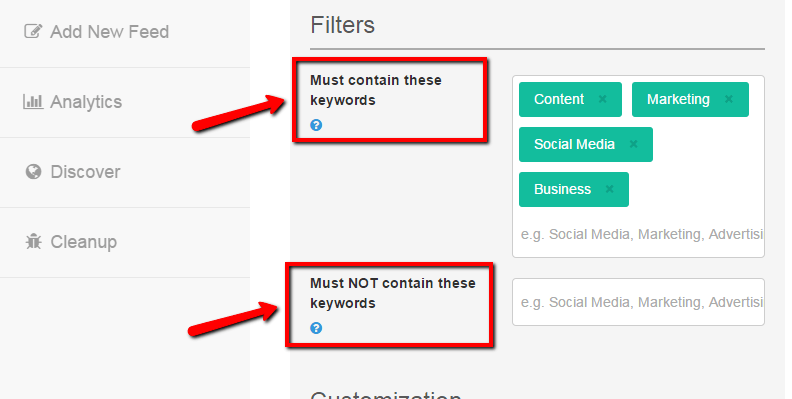
Instead of just taking ALL of the content on a specific website, you can add parameters or filters so the content that Twibble posts to your Twitter account is more targeted.
For example. I’ve setup my Twibble account to take posts from Entrepreneur.com. However, seeing how entrepreneur.com has a plethora of posts about different topics related to business, I added the keywords “social media”, “Marketing” and “content” (among many others) so Twibble will only pull content from Entrepreneur that has those keywords.
This makes your Twitter posts VERY TARGETED.
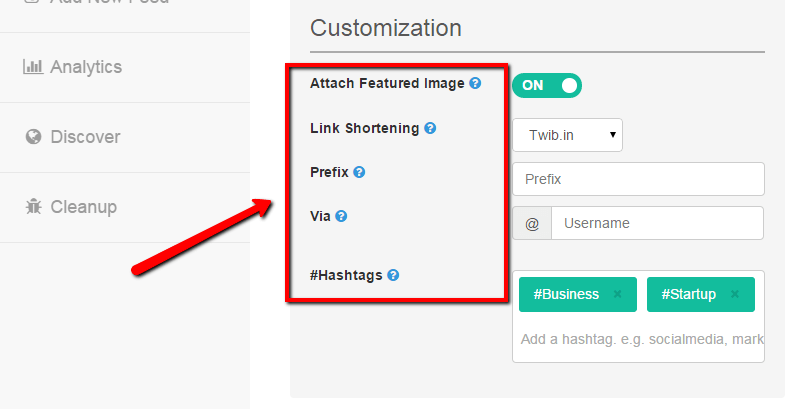
In addition to adding parameters and filters, there are other customizations you can add to your Twibble campaign.
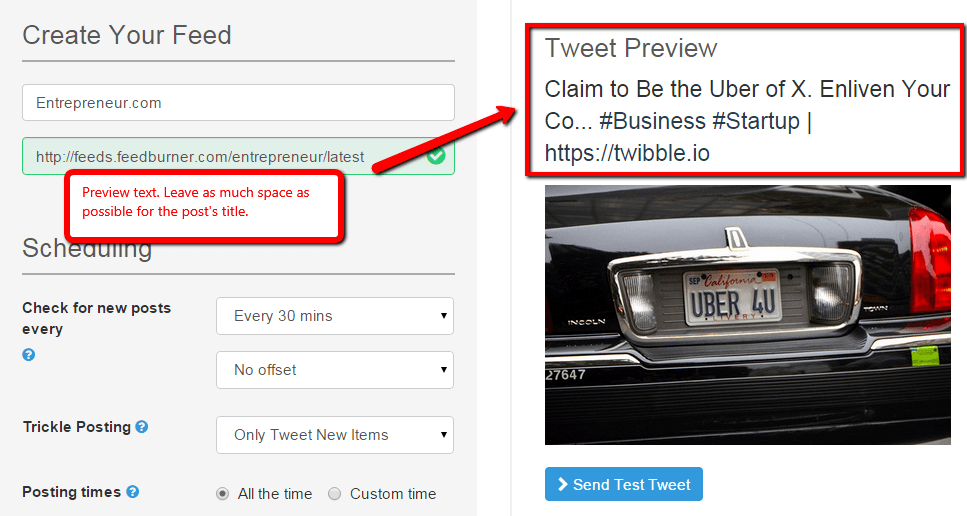
* Note – Don’t add too much hashtags on the customization feature because your Twitter post will have very limited space for the title. I also don’t add anything on the ‘prefix’ section so it doesn’t take up any characters on my Twitter post.
The idea is to get as much of the post’s title on your Twitter post so it becomes more descriptive. Adding too many hashtags and even the prefix will limit the number of characters that you would have otherwise been able to use for the post’s title.
Note that you can see all of these on Twibble’s preview section.
You can also set-up a couple of feeds on your Twibble account. This greatly helps as far as adding diversity on the sources where your Tweets are coming from. I’m a huge fan of Entrepreneur.com, Inc.com, Mashable.com, Writetodone.com and a couple more. Guess which sites I obtain my feeds from?
I’d also like to point out that you shouldn’t be too paranoid about posting too many Tweets. Apparently Tweeting every 30 mins can yield you GREAT RESULTS. Have a read here.
As you can probably imagine, if you have a solid social media following, once you tell the webmasters that you’ll share the guest post to your social media following (which consists of THOUSANDS of people), there a great chance that they’ll accept your offer since there’s also benefits to be had for them if they’ll accept it.
b.) Giving each site a closer look. Making sure that the site is definitely worth linking.
I talked to you about how I check the site’s PR, PA, DA and their monthly traffic when trying to sort out good sites from the bad ones right? I want to let you know that despite these numbers, there will be situations where you won’t be certain as to whether or not the site is in fact a good one to link to.
It’s in cases like these when you need to give the site a closer look.
In this section, I’ll talk to you about the next level of quality check that I use when determining the site’s quality.
What rockstar website do I use to do my second level of quality check? *** drum roll *** Similarweb.com!
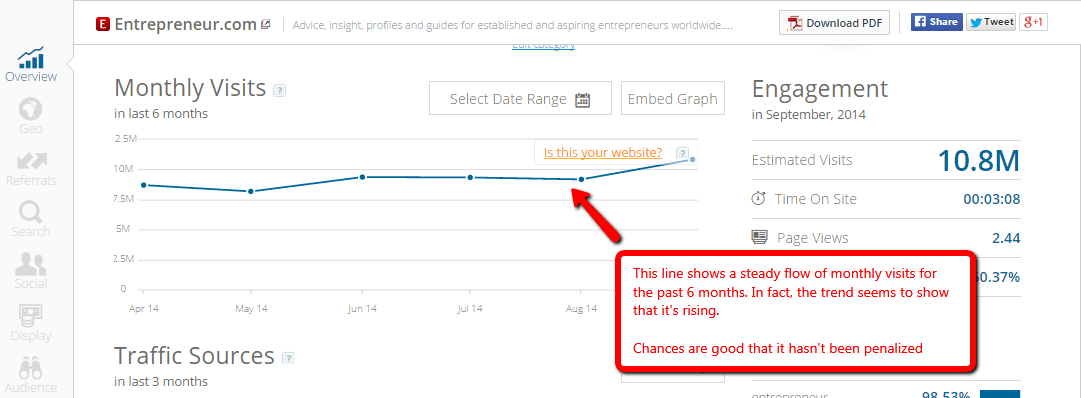
Similarweb’s free version has TONS of insights to give you as far as checking the site’s quality. For instance, if you want to check whether the site was recently penalized or not, you can check the ‘monthly visits’ section.
If the site doesn’t have a sharp drop in traffic in the past six months, then chances are good that it hasn’t been penalized.
However, there is more to looking at the graph than just that. It could be that there’s a spike on the site’s monthly visits because of a marketing campaign that they ran for that month alone. So when the next month came, their monthly visits seemingly dropped drastically when all it really did is went back to its normal figure.
You need to think about these things when looking at the ‘Monthly visits’ section when determining the site’s quality.
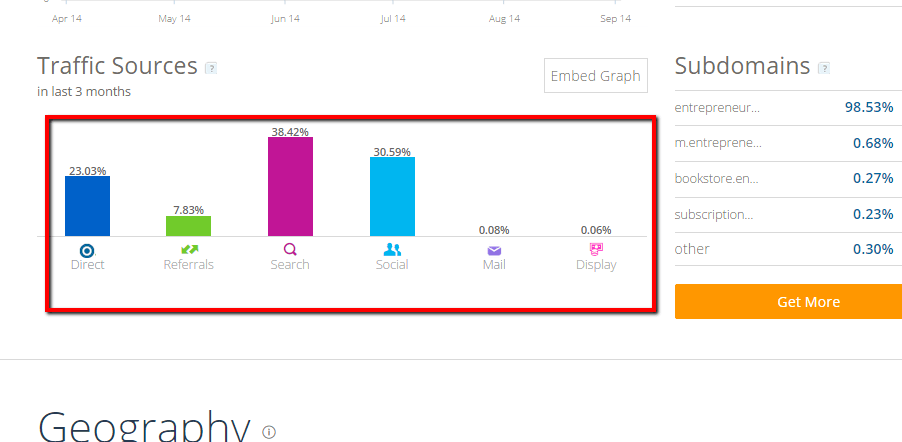
Another section of Similarweb that I’d like to take a look at as far as assessing whether the site is risky to link with or not is the ‘Traffic Sources’ section.
I tend to be wary when it comes to linking with sites that has a high percentage of ‘referrals’. For me, the ideal sites to link on are the ones where most of its traffic source is coming from the search engines. It just comes to show that the search engines love them and are probably ranking high on one or a couple of their pages.
However, sites with very high ‘Referrals’ might mean that they have their links plastered all over the web. There could be a couple of low quality sites linking to them. And as you may already know, having bad neighbors can also cause your site (or your client’s) to be penalized so you need to be very careful with this.
Remember that the search engines are getting smarter and smarter by the day so being extra cautious when linking is always a wise decision.
Conclusion
If you’re looking to start guest posting NOW, then simply follow the steps that I mentioned and you should be able to do it. The best part is, if you’ll follow the steps that I shared, you should be able to guest post more efficiently and even scale the process.
If there are questions, tips, and strategies that you’d like to share, please do so in the comments section below.
Photo attribution:
Featured Photo courtesy of David Castillo Dominici at FreeDigitalPhotos.net


